 Marshall Farrier's tech blog
Android: Creating a custom view 2011-02-05
The technique I'll present here allows you to create a custom view entirely in Java, then embed that view into an XML layout. While there are already numerous tutorials for creating custom views both on the web and in the literature, I couldn't find anything that explained what is actually essential in this particular kind of configuration. So, I had to piece it together from tutorials that explained something kind of similar but still not quite the same and then the usual trial and error.
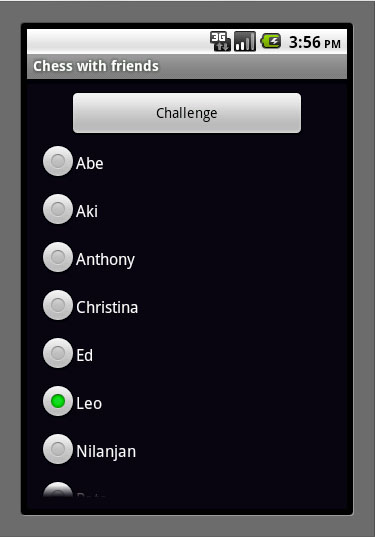
The need for this kind of custom view arose when I wanted to create a list of potential opponents for a ChessWithFriends app I'm working on. I'm not completely sure how this list will be populated in the final version, but it should certainly be more selective than the user's entire contact list. And, since you only should be able to challenge one person at a time, I wanted a group of radio buttons with one button for each person you might want to challenge.
It would be easy to create such a layout using XML if you only knew the names of all the players on your list and how long your list needs to be. Unfortunately, you don't know either of these things when you define the XML layout file. So, the RadioGroup has to be generated dynamically. But I still wanted to make as much use of XML as possible and create the parent views using XML.
This seemed like the obvious way to construct the XML file (assuming that we have our custom view):
<?xml version="1.0" encoding="utf-8"?>
<LinearLayout
    xmlns:android="http://schemas.android.com/apk/res/android"
    android:background="@color/background"
    android:layout_width="fill_parent"
    android:layout_height="fill_parent"
    android:padding="12dip"
    android:orientation="horizontal">
    <LinearLayout
        android:layout_width="fill_parent"
        android:layout_height="wrap_content"
        android:orientation="vertical">
        <Button
            android:id="@+id/challenge_button"
            android:layout_width="fill_parent"
            android:layout_height="wrap_content"
            android:layout_gravity="center"
            android:layout_marginLeft="30dip"
            android:layout_marginRight="30dip"
            android:text="@string/challenge_label" />
        <ScrollView
            android:layout_width="fill_parent"
            android:layout_height="wrap_content"
            android:orientation="vertical">
            <com.codemelon.chesswithfriends.PlayerRadioGroup
                android:id="@+id/players_radio"
                android:layout_width="fill_parent"
                android:layout_height="wrap_content" />
        </ScrollView>
    </LinearLayout>
</LinearLayout>
Now we just have to create the PlayerRadioGroup custom view appropriately. This isn't very hard, but I had some difficulties because I didn't realize what is essential and what isn't. Specifically, you must provide both constructors for the class. I started with the simple-minded approach of just defining the constructor from a context only. Then I ran across somewhere in the documentation (confirmed by some similar examples that I saw) that the mechanism for inflating a view from XML does actually use the constructor that takes both a context and an attribute set. So, here's a very stripped down (and simple) class definition that seems to work:
public class PlayerRadioGroup extends RadioGroup {
    private ChessDataBaseAdapter dbAdapter;
    private RadioButton[] playerList;
    // TODO Generate player list from database
    private static final String[] players = {"Abe", "Aki",
            "Anthony", "Christina",
            "Ed", "Leo", "Nilanjan", "Pate", "Peter", "Tanmaya"};

    public PlayerRadioGroup(Context context) {
        super(context);
        this.setOrientation(VERTICAL);
        init(context);
    }

    public PlayerRadioGroup(Context context, AttributeSet ats) {
        super(context, ats);
        this.setOrientation(VERTICAL);
        init(context);
    }

    private void init(Context context) {
        int len = players.length, i;
        playerList = new RadioButton[len];
        for (i = 0; i < len; ++i) {
            playerList[i] = new RadioButton(context);
            playerList[i].setText(players[i]);
            this.addView(playerList[i],
                new LayoutParams(LayoutParams.WRAP_CONTENT,
                    LayoutParams.FILL_PARENT));
        }
    }
}
The main thing to note here is that the emulator will abort your entire app if you don't put in the second constructor, which is the one actually used. The rest is pretty straightforward and generates the interface shown above when run on the Eclipse emulator.